VPS 配置 v2ray + WebSocket + TLS 梯子教程
Vultr
 Image credit: Unsplash
购买域名和VPS并添加域名解析
域名
由于要开启 TLS 进行加密,所以我们需要注册一个域名并且解析到我们的 VPS,我们可以到 万网 – 阿里云 选一个自己喜欢的域名购买。注意的是阿里云的域名购买后想要添加解析需要实名认证才能使用,如果没有实名认证,即使你添加了解析也是不生效的。购买一个.xyz结尾的域名即可

VPS
使用Vultr的服务器,支持支付宝付账,现在充10美元可以送100美元,觉得比较划算。配置了一个东京CentOS x7 x64的主机,每个月6$

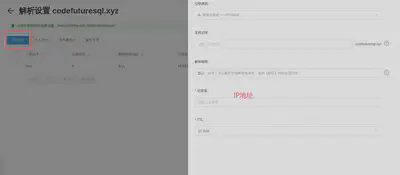
获取服务器的IP地址后,在阿里云域名界面添加解析,点击添加记录
- 记录类型:A
- 主机记录:均可,可以填www
- 解析线路:默认
- 记录值:IP地址
- TTL:10分钟
deploy主机的时候可以添加ssh key,方便后面ssh到主机上配置。
安装配置v2ray
v2ray 的安装很简单,安装脚本来自 fhs-install-v2ray,如要移除,请参考 README。
// 安裝執行檔和 .dat 資料檔
# bash <(curl -L https://raw.githubusercontent.com/v2fly/fhs-install-v2ray/master/install-release.sh)
安装好之后我们可以用 systemctl start v2ray 和 systemctl stop v2ray 来开启和关闭 v2ray。
该脚本安装的 v2ray 的配置文件路径是 /usr/local/etc/v2ray/config.json,如果忘记了可以用 systemctl status v2ray 来查看。下面我们编写配置文件
{
  "inbounds": [
    {
      "port": 10000, # 该端口需要与后面 nginx 配置的端口一致
      "listen":"127.0.0.1", # 只监听 127.0.0.1,避免除本机外的机器探测到开放了 10000 端口
      "protocol": "vmess",
      "settings": {
        "clients": [
          {
            "id": "b831381d-6324-4d53-ad4f-8cda48b30811", # 此处填写生成的 uuid
            "alterId": 0 #0或64都行,与后面保持一致即可
          }
        ]
      },
      "streamSettings": {
        "network": "ws",
        "wsSettings": {
        "path": "/ray"		#可随意设置,与后面保持一致,建议不变
        }
      }
    }
  ],
  "outbounds": [
    {
      "protocol": "freedom",
      "settings": {}
    }
  ]
}
直接赋值这个内容粘贴到 v2ray 的配置文件中即可,只有两个地方时要修改的,一个的端口(也可以不修改),一个是 id。id 的生成可以到 https://www.uuidgenerator.net
证书的生成和自动续签
TLS 是需要证书的,这里我们使用 certbot 来帮我们申请免费的 Let's Encrypt 证书,Let's Encrypt 是一家免费,开放,自动化的证书颁发机构,官方文档参考 Let’s Encrypt 快速入门。Let's Encrypt 官方建议使用 certbot 来进行证书的获取。安装 certbot 需要先安装 epel 仓库,命令如下:
$ sudo yum install epel-release

$ sudo yum install certbot
由于我们的 VPS 上并没有一个真实运行的网站(只是用来进行流量的伪装),所以我们需要用 certbot 的 standalone 参数来运行一个独立的网页服务器进行身份验证(certbot 需要确定你拥有域名指向的服务器的所有权),该网页服务器会使用 VPS 的 80 端口,所以你需要关闭 VPS 上的 web 服务器(比如 nginx)。申请证书的命令如下
# 添加免费SSL证书,example.com改为你购买的域名
certbot certonly --standalone -d example.com # 生成证书的时候会让你填一个邮箱,在证书快到期的时候会发邮件给你

# 安装成功后的证书路径
/etc/letsencrypt/live/example.com/fullchain.pem
/etc/letsencrypt/live/example.com/privkey.pem

# 查看已经生成的证书
certbot certificates
这里注意,如果出现红字说生成失败,那么要检查一下域名解析填的 IP 是否正确,也可以在 VPS 中 ping 一下你的域名看看能不能 ping 通,并且指向的 IP 是不是当前 VPS 的 IP。
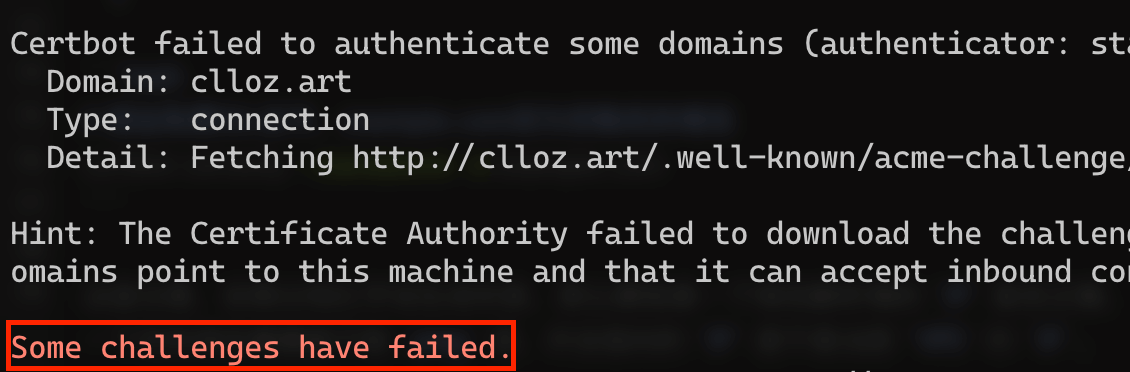
如果你的域名解析正确并且能够在 VPS 上 ping 通,但是还是一直红字提示失败,那么你需要检查一下 VPS 的防火墙,可以用 systemctl status firewalld 来查看是否开启了防火墙。一般来说出现这种情况都是因为防火墙的开启,比较简单的解决方法就是关闭防火墙:
systemctl stop firewalld
systemctl disable firewall
Let's Encrypt 的证书是免费的,但是每次证书的有效期只有 90 天,也就是我们至少在 90 天以内更新一次我们的证书,你可以到 VPS 上手动更新,命令时 certbot renew,还是要注意更新证书的时候需要关闭 nginx,否则会报 80 端口被占用。你用可以先用 certbot renew --dry-run 来检验是否能够成功更新,该命令只是检测,不会真的生成证书。
还有一个需要注意的点就是默认情况下只有证书有效期小于
30天的时候才能进行更新,如果有效期超过30天则会更新失败。
如果每次手动更新太麻烦了,我们可以使用 crond 帮我们定期执行更新命令,首先进行安装并启动(vultr 的 VPS 默认已经安装了)
crontab 可以用 cron 表达式帮我们定期执行一些命令,输入 crontab -e 就可以输入我们要定期执行的表达式了:
1 0 15 * * /usr/bin/certbot renew --pre-hook "systemctl stop nginx" --post-hook "systemctl start nginx"
表达式的前五个 * 或者数字是 cron 表达式,分别代表 分 时 日 月 年,* 就代表 每 的意思,比如上面的 1 0 15 * * 表示每年每月的 15 号的 00 : 01 执行后面的命令。--pre-hook 和 --post-hook 则是 certbot 的两个参数表示在执行 renew 之前和之后的两个命令钩子,此处表示我们先关闭 nginx 在执行 renew,renew 完成后再启动 nginx。
安装配置 nginx
配置了 TLS 需要一个 web 服务器,这里可以选择 nginx,apache 或者 caddy,我使用的是 nginx。
# 安装 nginx
yum -y install nginx

# 设置nginx的开机启动
systemctl enable nginx
nginx 的配置文件默认是 /etc/nginx/nginx.conf,不过我建议是在 /etc/nginx/conf.d 中创建一个独立的配置文件 v2ray.conf,方便管理。nginx.conf 会读取 conf.d 中的所有 conf 文件。创建好配置文件后写入如下配置
server {
  listen 443 ssl;
  listen [::]:443 ssl;

  ssl_certificate       /etc/letsencrypt/live/example.com/fullchain.pem; # 此处的路径写你生成的证书路径
  ssl_certificate_key   /etc/letsencrypt/live/example.com/privkey.pem; # 此处的路径写你生成的证书路径
  ssl_session_timeout 1d;
  ssl_session_cache shared:MozSSL:10m;
  ssl_session_tickets off;

  ssl_protocols         TLSv1.1 TLSv1.2 TLSv1.3;
  ssl_ciphers           ECDHE-ECDSA-AES128-GCM-SHA256:ECDHE-RSA-AES128-GCM-SHA256:ECDHE-ECDSA-AES256-GCM-SHA384:ECDHE-RSA-AES256-GCM-SHA384:ECDHE-ECDSA-CHACHA20-POLY1305:ECDHE-RSA-CHACHA20-POLY1305:DHE-RSA-AES128-GCM-SHA256:DHE-RSA-AES256-GCM-SHA384;
  ssl_prefer_server_ciphers off;

  server_name           your.domain; # 你的域名
    location /ray { # 与 V2Ray 配置中的 path 保持一致
      if ($http_upgrade != "websocket") { # WebSocket协商失败时返回404
          return 404;
      }
      proxy_redirect off;
      proxy_pass http://127.0.0.1:14400; # 这里的端口写你在 v2ray 中配置的端口
      proxy_http_version 1.1;
      proxy_set_header Upgrade $http_upgrade;
      proxy_set_header Connection "upgrade";
      proxy_set_header Host $host;
      # Show real IP in v2ray access.log
      proxy_set_header X-Real-IP $remote_addr;
      proxy_set_header X-Forwarded-For $proxy_add_x_forwarded_for;
    }
}
需要修改的地方我已经在注释中表名,请仔细修改,注意分号。编写完成后我们用 nginx -t 来测试配置文件是否有语法错误,一般如果显示如下命令则表示语法没问题,我们可以重启 nginx
nginx: the configuration file /opt/homebrew/etc/nginx/nginx.conf syntax is ok
nginx: configuration file /opt/homebrew/etc/nginx/nginx.conf test is successful

systemctl restart nginx
caddy是一个比较新的用golang实现的web服务器,我不是很熟悉,不过它可以自动签发https证书,这一点来说比较方便,如果你不想自己配置证书可以使用caddy。caddy的配置参考 新 V2Ray 白话文指南
上面的步骤都执行完了,一般来说我们的配置就已经完成了,此时在客户端上正确配置就能够访问 Google 了。我使用的arch linux,客户端配置大概如下所示:
{
  "log": {
    "access": "",
    "error": "",
    "loglevel": "warning"
  },
  "inbounds": [
    {
      "tag": "socks",
      "port": 1080,
      "listen": "127.0.0.1",
      "protocol": "socks",
      "sniffing": {
        "enabled": true,
        "destOverride": [
          "http",
          "tls"
        ]
      },
      "settings": {
        "auth": "noauth",
        "udp": true,
        "allowTransparent": false
      }
    },
    {
      "tag": "http",
      "port": 8000,
      "listen": "127.0.0.1",
      "protocol": "http",
      "sniffing": {
        "enabled": true,
        "destOverride": [
          "http",
          "tls"
        ]
      },
      "settings": {
        "udp": false,
        "allowTransparent": false
      }
    }
  ],
  "outbounds": [
    {
      "tag": "proxy",
      "protocol": "vmess",
      "settings": {
        "vnext": [
          {
            "address": "host.codefuturesql.xyz",
            "port": 443,
            "users": [
              {
                "id": "07ddbe34-60ab-4b08-872d-b3b1ff4bbb9e",
                "alterId": 0
              }
            ]
          }
        ]
      },
      "streamSettings": {
        "network": "ws",
        "security": "tls",
        "tlsSettings": {
          "allowInsecure": true,
          "serverName": "host.codefuturesql.xyz"
        },
        "wsSettings": {
          "path": "/ray",
          "headers": {
            "Host": "host.codefuturesql.xyz"
          }
        }
      },
      "mux": {
        "enabled": false,
        "concurrency": -1
      }
    },
    {
      "tag": "direct",
      "protocol": "freedom",
      "settings": {}
    },
    {
      "tag": "block",
      "protocol": "blackhole",
      "settings": {
        "response": {
          "type": "http"
        }
      }
    }
  ],
  "routing": {
    "domainStrategy": "IPIfNonMatch",
    "domainMatcher": "linear",
    "rules": [
      {
        "type": "field",
        "inboundTag": [
          "api"
        ],
        "outboundTag": "api"
      },
      {
        "type": "field",
        "inboundTag": [],
        "outboundTag": "proxy",
        "domain": [
          "t4.tianditu.com"
        ]
      },
      {
        "type": "field",
        "outboundTag": "direct",
        "domain": [
          "domain:example-example.com",
          "domain:example-example2.com"
        ]
      },
      {
        "type": "field",
        "outboundTag": "block",
        "domain": [
          "geosite:category-ads-all"
        ]
      },
      {
        "type": "field",
        "outboundTag": "direct",
        "domain": [
          "geosite:cn"
        ]
      },
      {
        "type": "field",
        "outboundTag": "direct",
        "ip": [
          "geoip:private",
          "geoip:cn"
        ]
      },
      {
        "type": "field",
        "port": "0-65535",
        "outboundTag": "proxy"
      }
    ]
  }
}
一开始并不能连接上网,后面检查客户端v2ray的日志,发现出现以下错误
failed to read response from www.gstatic.com > io: read/write on closed pipe
上网一查,发现是电脑时间比服务器时间慢了三分钟,导致无法连接,使用以下命令更新即可
sudo timedatectl set-timezone Asia/Shanghai

sudo timedatectl set-ntp true
参考文章
QianLong Sang
Fourth Year CS Phd
My research interests include operating system, computer architecture and AIOS.